• Ten tips-2: from design to stone

    Ten tips for beginning sculptors-2: from design to stone

    14072014229
    stone statue in the making and model. Click image for link to the first article on this sculpture

    Click here for the first ten tips for beginning stone sculptors.

    Readers of my blog may know it already: I have a thorough dislike of measuring. By measuring I mean taking a distance with a ruler or a tape measure, then remember that and reproduce it on the block of stone.

    I really don't like having to remember numbers. There must be another way
    I really don't like having to remember numbers. There must be another way

    I get easily confused doing that, have to stay very alert and still I sometimes forget the number by the time I get back to my block of stone. There must be another way. Here's a few tips to easily transfer measurements from the model to the stone, without any numbers. If you are interested in enlarging your design, then you will have to wait, because later will appear a follow-up article about that.

    1. Use a contour template. Take a piece of cardboard (I just love the cardboard used by plasterers for protection of floors, you can buy this in large sizes in a hardware store, preferably white), and trace the outlines of your model on that. It is easiest if you can put your design on a large flat piece of plywood and trace it exactly perpendicular with the help of a carpenter's square. Cut out the template, place it on your block of stone and trace that on both sides of your stone. After you've tightly carved away everything outside of those lines , you'll end up with a flat, 'jig-sawed-like’ statue. Look up Here is an example of this method, and here's a video in which is shown how it's done. Make a template of the front view as well, and try to transfer that as well as possible to your stone too, and cut that out as well. Now you have all four sides of your sculpture determined, and by carving that in the round, you'll already come very close to the final shape.
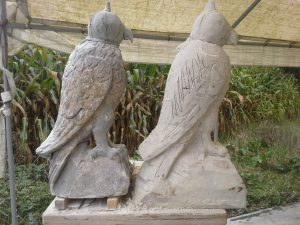
    Tips for beginning sculptors-2: from model to sculpture in stone

    2. Put your model tightly next to your stone. The closer the model is next to your workpiece, the easier it is to compare and see the differences. Sometimes I see sculptors copying a statue with their backs towards the original. Apparently it works just fine for them, but I could never work like that.

    3. First find the main volumes, and dont worry about cavities. For a novice sculptor a complicated piece of work can be quite confusing, with all of these protruding parts and holes and pits. Whenever you can't see the forest for the trees, it can be useful to simply close the gaps with a piece of clay. Then you'll see at once what the overall shape of the sculpture is, and it'll be much easier to focus on the general work of precarving. You'll make less mistakes because you are not distracted by too much information. Once you get more experience later on, you'll be able to make that translation in your head.
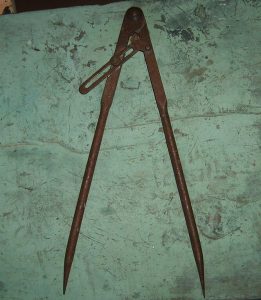
    Tips for beginning sculptors-2: Use a compass

    4. Use a stick for measuring. Put a stick against your model, and put a dash on it at every major size. When next you hold that stick against your stone, you'll be able to transfer all those sizes in one go, without numbers.

    5. Use a compass. With a (straight)compass, measurements can also easily be taken from deeper inside your model, without having to remember any numbers.
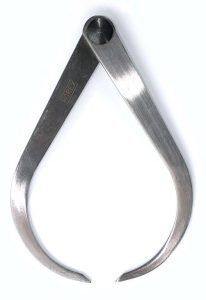
    Tips for beginning sculptors-2: measuring with a caliper

    6. Use a caliper. With the help of a caliper, widths- and thicknesses can be measured and thus checked whether you're nearing the right sizes.

    7. Use a box. Build two half boxes of plywood, with only a bottom, 1 side wall and the rear wall. Place both your model and your block of stone inside such a box, and make sure they can not shift. That way, three dimensions can be measured from those flat surfaces: the height, the width and the depth.

    8. Draw a grid onto your model and draw the same grid on your stone. This is actually a method for enlarging, but it can also be for one-to-one. I think this is actually quite cumbersome, but it is explained well in this book: The complete book of sculpting.
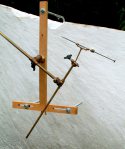
    pointing machine

    9. Use a pointing machine. A pointing machine is a tool to very carefully take all kinds of measuring points from your model over to your block of stone. It is also quite an expensive piece of equipment, and especially meant for very complicated sculpture. Read here a report on how to use it.

    10. Use your model itself for the dimensions! If you place the model and the stone tightly against each each other, the width will always be the same size. Once you have your compass at the right width setting, you can transfer all width sizes with the same compass setting. How does that work? Suppose: your block is 30 cms wide, and your model 29 cms wide. If you put them both side by side, half a centimeter apart, and you take the size of your block width with the compass, then you can easily mark all widths by placing your compass upon your model and put a dash near the other hand on your block. See for this method again the video in this blog post. For the other sides, you can easily put your model and sculpture next to each other in a different position.

    Bonus- the eleventh tip: 11. Keep drawing a lot while working!
    Occasionally you'll carve the drawn lines away again, or they'll fade, but if you continue to draw on your block of stone, with a pencil or a crayon or a marker, this will give you much guidance to know what should remain and what should go.

    Please note: I've been so busy with making things that I teach no courses or other instructions . So it's no use calling or emailing me about that.

    Continue to the next ten tips.

  • Ten tips-1: techniques

    Tips for beginning sculptors in stone-1: technique

    When I first wanted to learn to carve in stone I had trouble finding someone who could teach me this thoroughly. That was, of course, in the time before the internet, around 1990. Now, it's become a lot easier; just type in as a keyword that you want to sculpt in stone and you'll find loads of courses and holiday weeks . Unfortunately, not every teacher is equally aware of the technical aspects (there are still a lot of courses for rasping in soapstone) and neither does every aspiring sculptor have an appetite or time or money for a course. The following 'tips for beginning stone sculptors'’ should help you well on the way.

    1. Just start carving! Stonecarving goes from coarse to fine, and the chisels used to go from point chisel to tooth iron to flat chisel. Choose a soft limestone.

    2. Don't know what you want to carve? Just grab a piece of clay, close your eyes, squeeze into it and see what it looks like. You still don't know? Do it again. Try to vary with less or more thinking, shorter or longer time modelling, or not thinking from your head but just feeling with your hands! Then proceed to make a sketch on paper or a model in clay as memory support. This will give you guidance when figuring out what material should be taken away.

    Photo: Patricia Carabelli, Wikimedia Commons. CC BY-SA 4.0-3.0-2.5-2.0-1.0
    Armadillo. Photo: Patricia Carabelli via Wikimedia Commons.

    3. Use images on the internet! The internet is chock full with images of animals and people in all sorts of cool poses. Choose a topic that hasn't got too many holes or protrusions, because these are hard to achieve in stone, especially if you haven't got much experience yet.

    tandijzer in tandijzerhouder
    tooth chisel and tooth chisel holder with separate chisel insert. Photo: Reiner Flassig via Wikimedia Commons

    4. Buy a few simple chisels. If you're going to carve in wood you'll need many gouges and chisels, but for stone you'll only need a few. You'll need a point chisel (‘spitsijzer’), a flat chisel and a tooth chisel. Next, you'll need a hammer and that's it. You could choose to buy these chisels in a few different widths, but in the beginning you won't need much more.

    Chisels wear out of course, and then you'l have to sharpen them again by grinding. Therefore, it is not really smart to buy an expensive stone chisel. Rather buy a chisel holder, in which you can put several different and interchangeable inserts . There are coarse and fine-toothed inserts and flat insert plates. One could also grind such an insert plate a bit round, for instance for carving a pit without leaving ugly spots with the corners of the chisel.

    800px-Mallet2
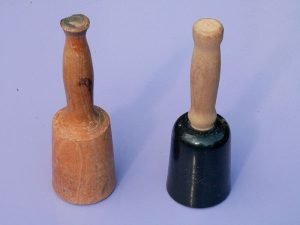
    bottle mallets of wood and plastic

    5. Don't choose your hammer too heavy. There are hammers of steel and (soft)iron for hitting hard, and hammers or mallets of wood or plastic for a rebounding stroke. The hardest hitting would normally be done in the beginning, and for finer work, choose a mallet. To which the appropriate chisels fit. Chisels for a mallet have a widened head so you won't damage the mallet on the head of the chisel. Chisels for a steel hammer have a small head. Through all the beating it will get a sharp burr on it, which you'll regularly need to remove by grinding, or else you'll injure your hand. Choose a steel hammer and a mallet. Choose a plastic mallet if you have the money, because that will last a lifetime. Are you very strong? Then buy a steel hammer of 1 kilogram. Heavier makes no sense, you'll only demolish yourself besides the stone. Are you average strong? Then choose 750 gram. If you are very slender-built you will find even that too heavy. For a mallet it will be about the same.

    6. Practice your stone masonry techniques! Below is a series of videos with the basic techniques for carving a rough stone surface flat. It seems uninteresting to just carve a plane, but these are techniques you will keep encountering during the carving of your sculpture.

    7. Download the free pdf (in Dutch) with stonemason's exercises: carving a plane, concave and convex profiles and other stonemasonry tips: Basic techniques of sculpting in stone.pdf

    sculpture book

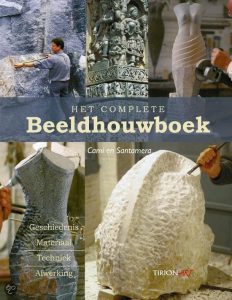
    8. A good book as a reference guide: The complete book of sculpting.
    Camí Santamera (Josepmaria Teixido i Camí/Jacinto Chicarro Santamera)
    Cantecleer Baarn, 2001. ISBN 90-213-3126-8 / 90-439-1253-0

    A clear book with good pictures and explanation of different movements and techniques of sculpting in stone, for example direct carving, copying with the "pointing machine", enlarging and various methods to copy models in stone.

    9. Visit someone who already has the skills necessary. You will learn more by watching someone work then from all the tips on paper. If you're not able to visit a sculptor, then search for videos on the internet. Below is a video of myself; Read more about this project here.]

    10. And finally: do look for that thorough course in sculpting where you can learn everything about the techniques of carving in stone. It's always about what you make, and about your design. Technique is not important, until the lack of it starts to become an obstacle. For the end result, it doesn't matter how you have created your sculpture, even if it was made with your teeth or with a screwdriver. But if you get stuck in your work out of frustration because you can't make what you have in your head, that would be a waste of your time. Therefore, learn the techniques well, so that later on, you'll never need to bother with those again. As a beginner it would be best to learn all about the practicalities; which will provide a basis that gets you started for the rest of your life. Later on, you can still focus on the design, which is actually the only thing of importance.

    Please note: I've been so busy with making things that I teach no courses or other instructions . So it's no use calling or emailing me about that.

    Continue to the next ten tips.

No more messages to show.

No more messages to show.